
2Edit
Step 2: change the start texture with a prompt while keeping its structure. Presets, versions, color match, and how to skip it.
Step 2 changes your start texture with a prompt, while keeping its structure: remove something, change a color, add weathering, make it look more handmade. It's optional. If the texture is already right, skip it.
When to use it
- Remove something: leaves, a crack, a stain, a logo.
- Change the look: another color, wetter, older, more worn.
- Clean up a photo: take out lighting and shadows, or the last bit of perspective.
- Improve quality: sharper detail, less noise.
To skip the step, click Next step at the bottom without editing. The step then shows Editing was skipped.
The edit form
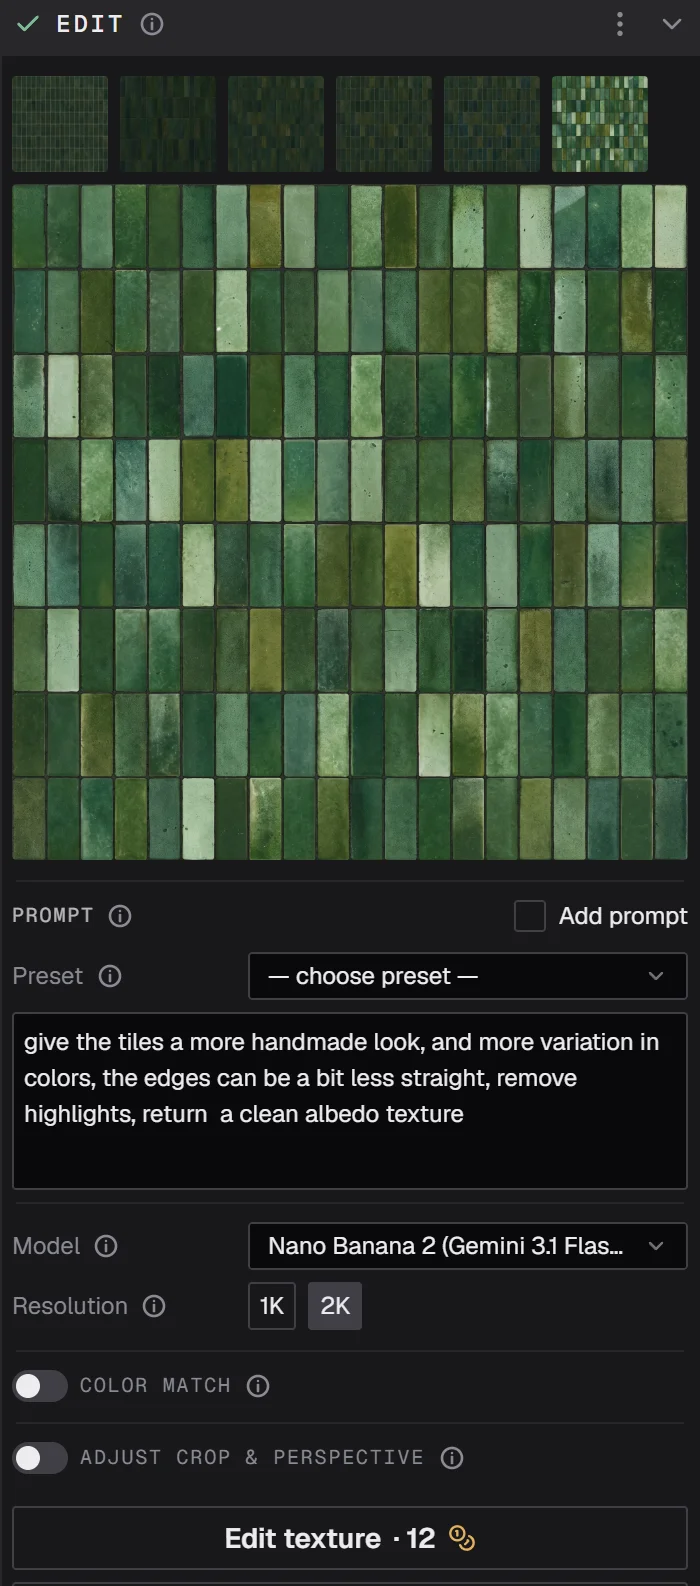
Prompt
Write what should change, not what the whole texture is: remove the leaves, make the bricks darker red, add moss in the gaps. The AI repaints the image and keeps its layout.
Add prompt adds your step 1 prompt to the edit, so the AI knows what the material is. That helps when the edit is only a few words. Click the added prompt under the box to read it, and edit to change it for this edit.
Preset
Ready-made edits with a prompt and a model that work well together:
- Increase quality
- Remove lighting and shadows
- Strong perspective removal
- Zoom out
- Add weathering
Pick one to fill in the prompt and the model. You can still change the prompt afterwards.
Model and resolution
- Model: the AI that repaints the image. Models differ in how much of the original structure and detail they keep.
- Resolution: the size of the edited image, as far as the model allows. It can be larger than the start image, for example a 1K texture edited into 2K. If the model can't reach your start texture's size, it says so next to the buttons.
Click Edit texture. The price in credits is on the button. As a guest you get one free edit.
Versions
Every edit is kept as a new version, in a row of thumbnails above the texture. Click one to make it the current version; the eye on a thumbnail shows it full size in the 2D view. The first thumbnail is your start texture, so you can always go back.
Whichever version is selected when you click Next step is the one step 3 uses.
Color match
Edits sometimes drift warmer, cooler or more saturated than the original. With an edited version selected, switch on Color match to pull its colors back toward the start texture. Amount sets how far: 0 keeps the edit as it is, 1 matches the original's color balance. You see the result on the shader ball straight away.
Tip: an Amount of around 0.8 usually brings the colors home without undoing the edit.
Crop & perspective
Step 2 has the same Adjust crop & perspective editor as step 1, for the current version. It's useful after a Zoom out or a perspective-removal edit, to choose the exact part that becomes the material. See Crop & perspective on the Start page for how it works.
Next step
Click Next step to go to step 3, Create with the selected version.
Prefer video? Our tutorials are on YouTube.